How do I work with my student list?
- From the “Main Menu” click on “Students”. Or use the “Go To…” drop down menu
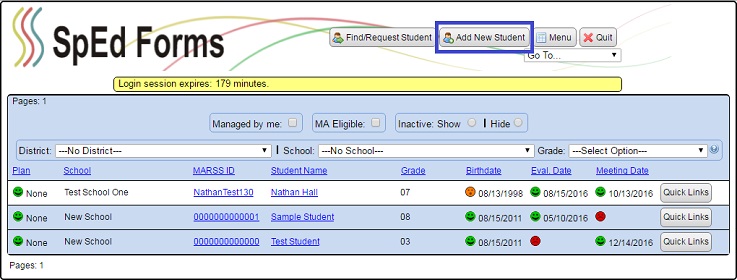
- A list of students will appear.
- To work with student information, click the student's name button next to the appropriate student.

These are either students you have case manager rights to(shown with a blue background) or students shared with you by another case manager (shown with a white background).
Here are some other things you can do with your student list
- Your student list provides important dates at a glance.
- Green smiley faces indicate dates that appear to be entered correctly.
- Red and orange faces indicate important dates have not been entered or need to be edited/adjusted (for more information, click on the appropriate face).
- Blue smiley faces indicate a GenEd Student.
- Grey smiley faces indicate an inactive/exited student.
- You can control if you want to see inactive or “Exited/GenEd” students by checking or unchecking the “Inactive” check box.
- You can limit the list to only show students you have case manager rights to (shown in blue) by checking “Managed by me” check box.
- You can limit the list to only show students who are MA eligible by checking the “MA eligible” check box.
- You can access quick links to available forms for each student by clicking “Quick Links” (new)
- Clicking a student's ID number will take you directly to that student's setup page.
- Clicking a student's name will take you directly to that student's form page.
- You can sort the list by Student ID, Name, Birthdate, Eval written date or Meeting date by clicking the link in the column headings.
- Clicking the “GenEd Forms” tab will show a larger list of students, including students not in special education.
- You can add a new student by clicking the “Add new student” button.
- You can request access to a student from the current case manager by clicking the “Find/Request Student” button.